
To view detailed information of the printers that are monitored on a specific client you need to choose a client:
Viewing Printer Details
There are two ways to open the printer details: by selecting it and clicking View Details, or by double-clicking the printer. See below:
And, from the Printer Details, you can check out a lot more information and details. We will see them all below.
Defining Location, Department, Asset Number and Remark
Defining location and department is key for a client that has many leased printers. This will make your fleet information more organised.
To define the location, department, asset number and even a specific note about the printer / point where it is being monitored is very easy, just open the printer details and locate the fields referring to this configuration, follow:
It is necessary to register the locations and departments previously in the Clients menu .
Adding and tracking supply levels
It is possible through the printer's Details to track the current level of supplies that it is capable of providing. With the use of the Supplies Management module activated it is possible to perform exchanges that end up generating information such as: average time for exchanges, average printed pages and average coverage per page.

To learn more about usage indicators and the Supply Management module click here.
Viewing the History tab
Through the History tab you can check important numbers regarding page production per month and also per day (the last 30 calendar days).

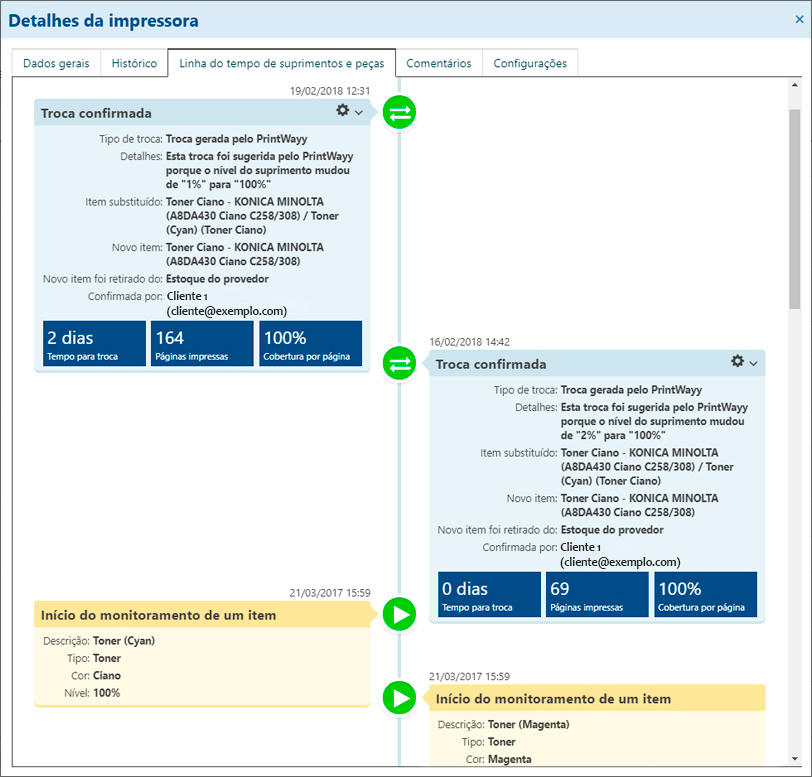
Supplies and Parts Timeline
The tab of the timeline of Supplies and Parts serves as a panorama for analysis from the beginning of the monitoring of the items in the printer, and also their changes, with the possibility of inserting remarks on the change, not considering the change in the calculations of averages and also the possibility of excluding the change.
Comments
All printers have a Comments tab, which allows important information about the printer to be recorded, as per the example below:

Settings
In the Settings tab of the printer details you can set some monitoring settings in relation to the current printer:
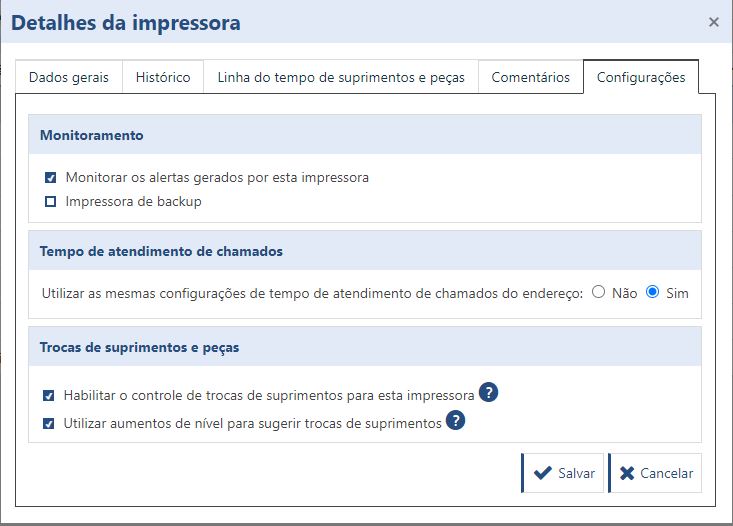
Monitoring
Time taken to answer calls
- : this setting indicates whether the printer should not use the same SLA settings as the address. If "no" is selected then the setting below will appear;
- : even if you do not use the SLA settings of the current address of the printer, you can set as "yes" the time control to answer calls and then the next setting will appear;
- : this configuration exists to indicate what the maximum service time is for that printer, dividing it further into Current Hours, Provider Working Hours, Customer Working Hours.
Exchanges of supplies and parts
- Enable supply change control for this printer: this setting is used to enable advanced controls for supplies in this printer such as: being able to record changes and additions of supplies and parts, track the history of average consumption and coverage per page, view the timeline of supplies, and get estimates of actual levels and predicted dates for upcoming changes;
- Use level increases to suggest supply changes: if this option is unchecked, when the level of a supply for this printer increases, PrintWayy will not register a supply change suggestion.
Opening calls for a specific printer
It is possible to open calls in a simple and fast way by selecting the printer and clicking on the "Open call" button:
Having set the Call Type and Description properties, then just click Save.
To view this new call and also learn all about our Help Desk module click here.
Adding a new printer on the client
To add a new printer via this menu it must already be part of your park, if the printer is not yet monitored or not added to the park, click here.
To add a printer on the client, click on "Add a printer on the client":
After clicking Next, two new options will appear:
- Manual registration, with manual counter entries: by selecting this option, the printer will be added to the client as a manual registration and will need to receive counters manually through the PrintWayy website;
- Automatic monitoring via network: by selecting this option the printer will be added to the client with automatic monitoring via the network, without the need for manual counter entries on the PrintWayy website. For this to be possible, you need to inform on which computer of your client with PrintWayy Client installed this monitoring should be activated, and what is the IP address of this printer in this client's environment.
Attention: when you choose to add a printer with automatic monitoring, make sure that the installation point and IP data are correct, otherwise the automatic monitoring will not work.
If you select to add a printer that is monitored on another client, PrintWayy automatically terminates that monitoring so that the printer is added to the current client. The system understands that a printer cannot be monitored on two clients at the same time.
Adding counters on manual printer
Manual counter registration must be used to enter counters for printers that are allocated to clients, but are not yet automatically monitored by PrintWayy. It is possible to perform manual counter registration only for manually registered printers. The counters posted in this registration will be counted in the same way as the counters captured automatically, so it is necessary to pay maximum attention when performing the registration, to avoid inconsistency in the numbers and, consequently, failure in reports and graphs:
Attention: it is not possible to enter a capture date lower than the date entered on the last entry made. In addition, it is not possible to change data already registered. Therefore, be very careful when registering the manual counters.
Deactivating monitoring
To deactivate the monitoring of a printer, simply select it and click on the "Deactivate monitoring" button:
A confirmation window will pop up and you must confirm the time that this printer will be picked up from the client. By default, the time of the last communication between this printer and PrintWayy will appear.
Even after deactivating the monitoring, it is possible to see her information on this same screen, however, it is necessary to disable the option "Hide printers that are no longer monitored". Located in the upper right corner:
Reactivating monitoring
To reactivate monitoring is very simple, just select the printer that has monitoring disabled and click "ReactivateMonitoring":

Two options will then appear:
- Start a new monitoring, independent of the previous one: the printer will not display the history of counters and supplies of the first pass through the client, it will be like a first monitoring of this equipment on the client;
- Continue monitoring from where it left off: monitoring is continued from where it left off, so it is as if the printer never left the client and all the counter and supply history will continue to be displayed.
Simply choose and finalise the procedure by clicking on Reactivate monitoring.
To return to the Printers menu click here.
To go to Full Park click here.
To go to New Printers click here.